
Dive Deeper in Python
View or download the code for this chapter on GitHub:
github.com/nousbase-edu-codes/First_Steps_in_Python
TL; DR
- Strings = Text
- Pandas helps us store and manage real data in table form
- Pandas uses dataframes for the management of tabular data
- We can access rows and columns, add or update data, and perform calculations easily.
- Pandas can read and save files easily.
- List comprehension basic syntax :
[expression for item in iterator] - Constructor = A special method that creates object and sets its initial data
Strings
See the program below, it is for checking the eligibility of an applicant for Sci-Mate club.
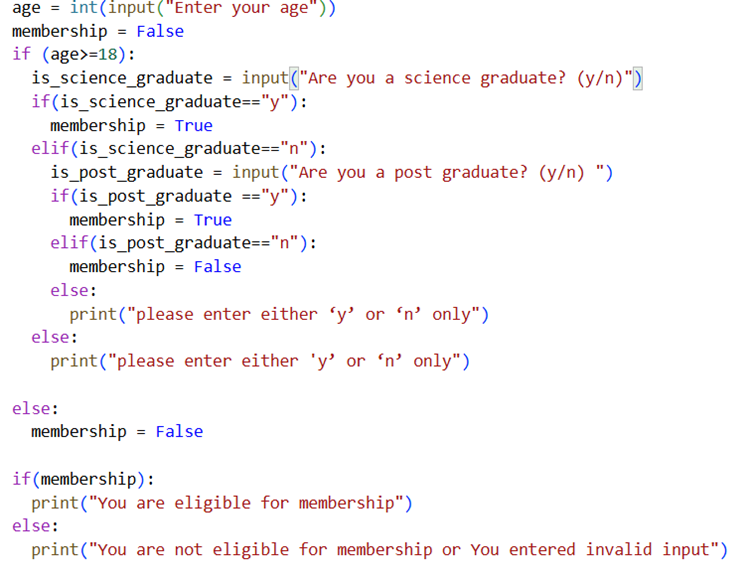
Now, when we ask user Are you a science graduate? (y/n), we expect user to enter “y” or “n” as directed.
But user may not obey and enter “Y” or “N” or “ y ”, “ n ” also.
As a programmer, our aim should be to develop user-friendly software.
So, we won’t be strict on user and allow “y”, or “Y” or “ y ” or “ n ” etc.
A good solution would be to standardize the input by user.
- Remove the spaces prior and later to the letter
- Convert it to lower case and compare
All the text that is in double quotes is object of class str, a short form for string.
To create a string, we simply put double quotes around the text.
print(type(a))
Gives us <class 'str'> as output.
creates a blank string.
This is useful when we want to create string and assign it value at later stages.
Now, str class has many methods to process strings.
First, we can individually access characters in string just like list.
print(a[1])
This code prints “e”.
str class has method lower() which returns a string which is all lower-case version of the string.
Let’s see some of the methods of str class and how they return output.
Note that these methods return new string which is in desired format. Original string remains intact.
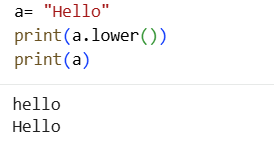
Note that, as in image, when we print a.lower() we get lower case “hello”, but when we print a after that, we get the original string “Hello” only.
Let we declare a string:
There are blank spaces at end. We will see what output we get with different methods.
| Method | Purpose | Output |
|---|---|---|
| a.lower() | Get string with all lower characters | i know python very well!! |
| a.upper() | Get string with all lower characters | I KNOW PYTHON VERY WELL!! |
| a.strip() | Get string with former and later spaces removed | I know Python very well |
| "123".isnumeric() | Returns true if string is all numeric | True |
As a.strip() returns string, we can use other methods of string with it also.
So, various inputs like “Y”, “y”, “ y ” etc. all will return “y” when we use t.strip().lower().
We can easily check it now.
Suppose we want to confirm user has entered only “y” or “n” and not any other text, so that we can warn user. This can be easily achieved using in operator as we have seen in previous chapter.
We will create list of valid inputs, like [“y”, “n”] and check if user’s input is in the list.
The expression "y" in ["y", "n"] returns True.
So, we can re-write qualification check logic now in much better and manageable way.
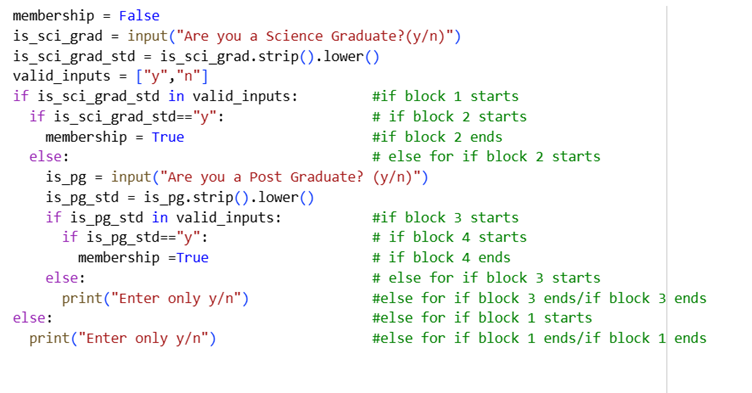
Carefully read the code. Read multiple times.
Understand the nested structure of if blocks. Pay close attention to where one block starts and where it ends. Some if blocks don’t have else, simply because it’s unnecessary as membership value is by default set to False and in else block, we would set it False only.
str class has lots of useful methods. We have just seen introduction to some.
Still, I would like to fetch your attention to 4 more things.
1] Slicing a string: A string “Hello World” can be sliced like we slice lists.
b = a[2:5]
print(b)
This prints “llo”.
2] Joining strings in list: Suppose there is a list of words [ "I", "know", "the", "Python" ]
We can join all the words in list with any separator like “-” using join() method.
Simply follow:
b = "-".join(a)
print(b)
Gives us “I-know-the-Python” as output.
3] Splitting the string: Now, we want to reverse the above operation and want all words separate. We can do it with split() method.
b = a.split("-")
print(b)
This gives us list ['I', 'know', 'the', 'Python']
In above 2 examples, we can very well use space (" ") as separator or connector.
4] Joining (concatenating) 2 strings: This is very intuitive and simple. Just use “+”.
b = "World"
c = a + b
print(c)
This gives us output “HelloWorld”! To get “Hello World” output, what would you do?
You guessed it right! Just do c = a + " " + b. Try it!
Progress Unlocked
- You can now standardize and process strings
Pandas
We have written Member class.
What if we can store and manage data in rows and columns style like excel?
A super powerful library pandas helps us to achieve this.
We will be having a very short introduction to pandas library. This library in itself deserves a dedicated book.
In pandas, data is stored like a row-column structure. We call it a dataframe.
We have seen how information of members can easily be described in dictionary.
If we have multiple such members, then each member can act as a row of dataframe and keys of dictionary will act as columns.
For example,
In following dictionary,
{ "name" : "John",
"birth_year" : 1990,
"phone" : 1223,
"address" : "South Block, Gotham City"
}
name, birth_year, phone, address will serve as columns of dataframe and (“John”, 1990, 1223, “South Block, Gotham City”) as row.
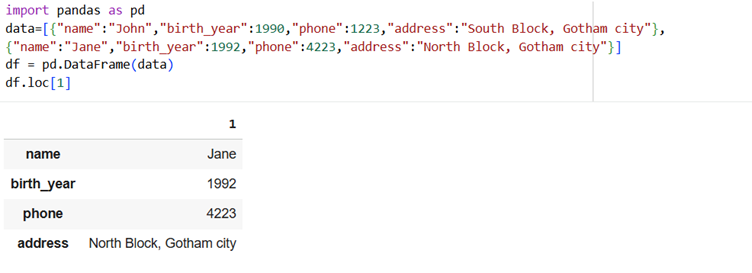
We need to import pandas before using it. We can create dataframe simply as list of dictionaries! See the example below:
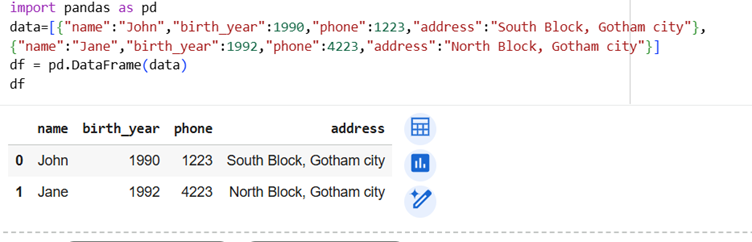
DataFrame constructor is used to create dataframe object.
We feed it List of dictionaries as data. You can see tabular output above.
NOTE: Data can also be formatted as dictionary of list. Key of dictionary becomes column name and value for key becomes column values.
In the previous example; 0 or 1 in leftmost column is index. Here, index is row-label.
We can directly convert list of objects to dataframe, but we will see it a bit later.
As of now, let’s do some operations as per requirement of our club management.
1] Dataframe is ready. Now print the details in 2nd row.
By default, pandas assigns index values as 0, 1, 2, ...
So, the 2nd row has index 1.
We use .loc to refer to rows using index labels.
Example: df.loc[1]
See the example below:
2] Count how many members are in dataframe.
Here, our old friend len() helps.
gives us number of rows, i.e., 2 here.
3] Add the details of “Jack” to dataframe. (add a row)
We simply go to the index after last row and assign details of “Jack” as list of values. But remember, order of values in list must be same as the order of columns of dataframe.
How to go to the index after last row?
Simple, it’s
If we have 2 members, then occupied indices are 0 and 1.
We have to add “Jack” at next index, i.e., index 2, which is same as len(df).
This would add “Jack” to the dataframe.
Note: This works because our dataframe is using default numeric indexing. We will continue with this indexing as of now.
4] Check names of all the members [Print column data]
We just have to use df["name"] to print all the details in names column.
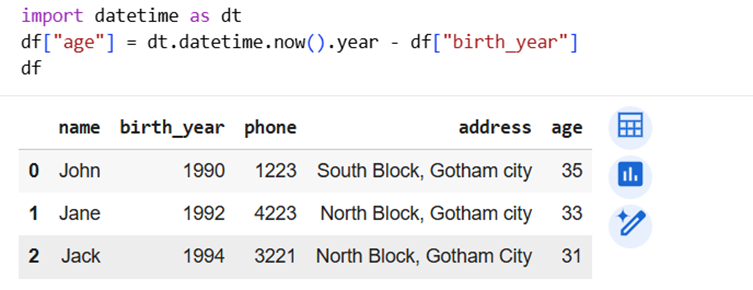
5] Add the age column (add new column)
Currently, we are not using objects, so we can’t use get_age().
We will need to compute the age.
Here comes the interesting point.
Dataframes are designed such that you don’t need to loop through them. Instead, you write code as if you are writing for a single row and it will be applicable to all the rows.
So, assigning df["age"] will automatically assign age values to all columns based on computation.
Here, we will need to add computation, for that, we will just use the expression that we used in get_age() :
So here,
this will run for every year in birth_year column in dataframe.
See the whole code below:
NOTE: As a good practice, don’t modify df itself for addition of new column etc., unless you want to save the modified df.
Better option is, copy df to another dataframe using function copy() and add column there.
Processing will be done on df1 keeping df intact.
6] Get the average age of members
Simply, use df["age"].mean(). mean() gives the average value.
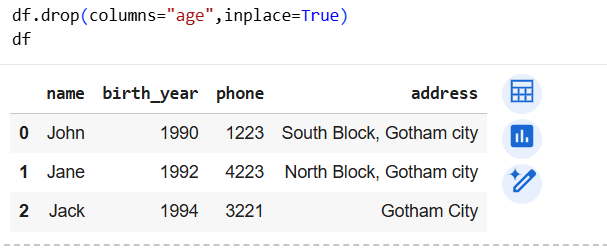
7] Remove the column age now.
We use drop() method for this.
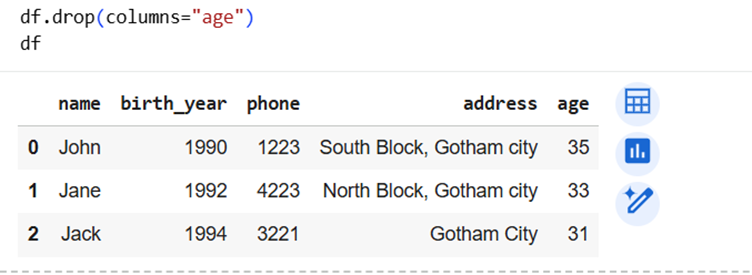
We used drop() but still column “age” is there!
What happened?
The drop method doesn’t change original dataframe. Instead, it returns new dataframe without age column.
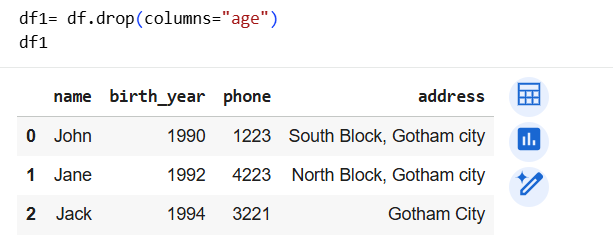
Now it works!
We can also effect the change in df dataframe itself.
For it, we use inplace=True in drop method. This gives effect “in place” i.e. to df itself.
8] Find the members born before 1993 [Conditional Filtering]
This is very useful feature of pandas.
We place a condition inside df[ ].
Only rows where the condition is True are returned (Dataframe will return only those rows where list has “True” at same index)
See the code example below. We created list [True,False,True] and used it to access dataframe. Only those rows with True value in list were extracted.
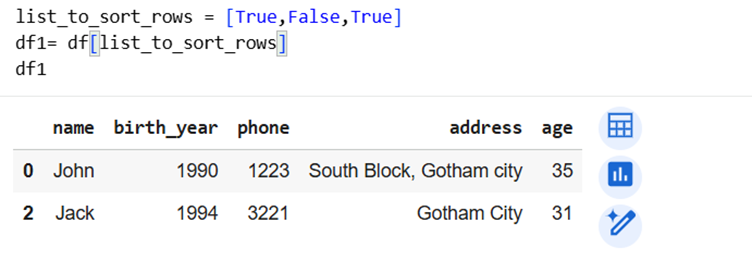
We use same feature for conditional filtering.
We put an expression to access the sorted dataframe.
The expression will be our condition.
Here, we want all with birth year prior to 1993.
So, our condition is
Use same expression to access dataframe and we get conditionally sorted dataframe.
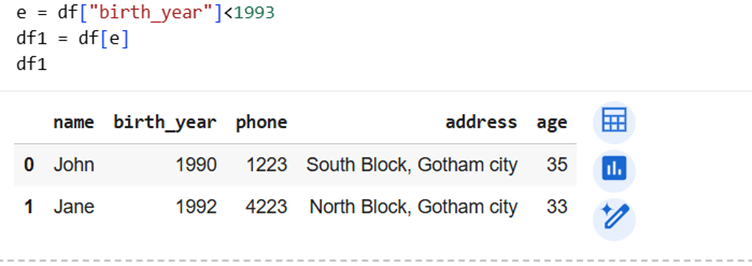
We can see the results in above screenshot.
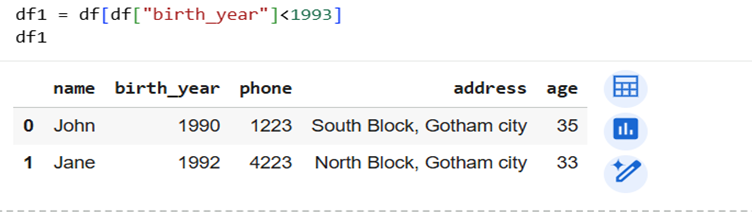
Now, we can also shorten the steps and exclude defining e and all. Use condition directly inside df[ ].
9] Get element from 2nd row and 3rd column (slicing dataframe)
Here, we are trying to access an element at 2nd row and 3rd column.
Remember, we use 0-based indices.
To access individual element, you can use:
So, e = df.iloc[1,2] gives us 2nd row, 3rd element
slice of df: rows 1 to 2 and columns 1 to 2 to df1
slice of df in df2, rows 2 to 3, all columns. (last index excluded)
10] Update particular value
Jack noticed, his address is just “Gotham City” on record. He wants to update it to “North Block, Gotham City”.
For this, we will first access the element using .loc and update it.
For row: use the expression that will be true in Jack’s case.
For column: use what we want to replace i.e. “address”
So, code becomes
df.loc[row_expression, column_name_to_update] = new_value
i.e.
Important: Save the dataframe for further use
We can save and load dataframe for further use.
As of now, we are using colab. So, this particular part in our book is limited to our project only. You should store data into databases. That discussion is out of scope of this book.
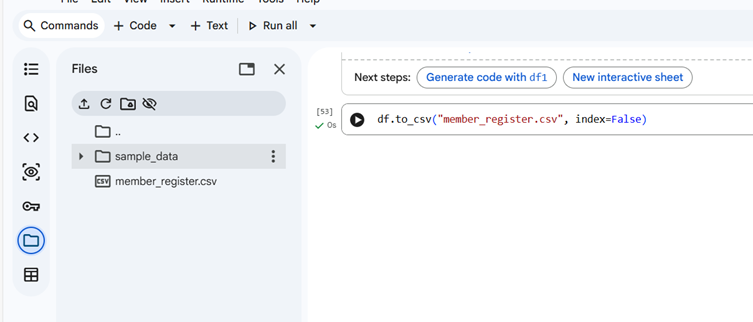
- Use this to save:
df.to_csv("member_register.csv", index=False)
This will save our dataframe in folder in colab.
See below:
- Use this to load file again:
df = pd.read_csv("member_register.csv")
This file will be saved in CSV i.e. comma separated value format. In this format, rows are stored in separate lines with columns separated by comma. Pandas can read excel files too.
e.g.
"John",1990,1223..
"Jane",1992,4223..
We have learnt basics about pandas. Pandas is a big topic in itself.
We just covered the introductory material.
I encourage you to try all of the above operations and also try some of the operations at your own. For example, you can add more members, add more columns, slicing dataframes etc.
Let’s see the summary of all we have learnt about Pandas:
| Task | Pandas Code / Idea | What it Does |
|---|---|---|
| Access a row by index | df.loc[1] |
Gets row with index label 1 |
| Count number of rows | len(df) |
Returns total number of members |
| Add a new row | df.loc[len(df)] = [...] |
Adds data at the next index |
| Access a column | df["name"] |
Prints all values from name column |
| Add new column | df1["age"] = current_year - df1["birth_year"] |
Computes age for all rows |
| Copy dataframe | df1 = df.copy() |
Keeps original data safe |
| Average of column | df["age"].mean() |
Finds average age |
| Remove a column | df.drop("age", axis=1) |
Returns dataframe without column |
| Remove column in-place | df.drop("age", axis=1, inplace=True) |
Permanently removes column |
| Filter rows by condition | df[df["birth_year"] > 1993] |
Returns matching rows only |
| Access single element | df.iloc[1, 2] |
2nd row, 3rd column (0-based) |
| Slice rows & columns | df.iloc[1:3, 0:2] |
Extracts part of dataframe |
| Update a value | df.loc[df["name"]=="Jack","address"] = "..." |
Updates selected cell(s) |
Progress Unlocked
- You can use store and process tabular data programmatically
Now, as I had said before, we will see how to add the object of class to dataframe.
Before that, we will study a very interesting topic, List Comprehension.
List Comprehension
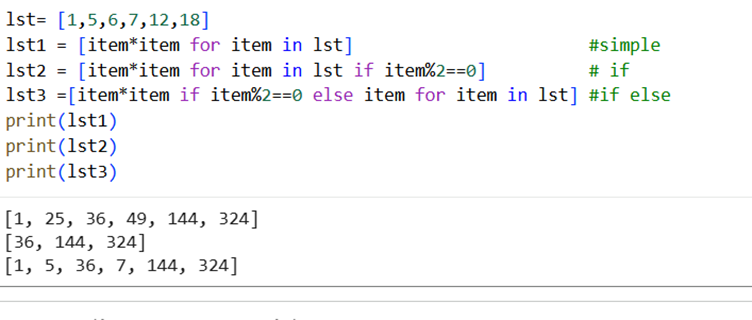
I have a list of numbers, lst1 = [1,5,6,7,12,18]. I want a new list with squares of each number in list.
Of course, you will create first empty list named lst1_squares, run a for loop on lst1, append the square of each value to lst1_squares.
Perfectly valid.
lst2 = []
for item in lst1:
lst2.append(item*item)
print(lst2)
But let me tell you, we can convert these 5 lines of code into a single line!
We first declare the new list: lst2 = []
Inside the list, we add expression which is part of for block: lst2 = [item * item]
Following to it, we just add for block declaration lines:
lst2 = [item*item for item in lst1]
How beautiful it is!
And it doesn’t stop here; we can also implement condition.
Suppose, we just want a list of squares of even numbers.
Just add condition after the for lines.
We can easily write now the condition to check even numbers: item % 2 == 0
So, lst2 = [item*item for item in lst1 if item%2==0]
Gives us [36,144,324] in lst2.
We can also have else condition too. Suppose, in lst2, we want squares of even numbers but keep odd numbers as it is:
Only difference is, we now want to clarify condition before looping using for.
So, lst2 = [item*item if item%2==0 else item for item in lst1]
Gives us [1, 5, 36, 7, 144, 324].
We can simply state syntax for list comprehension as:
- without if: [expression for item in iterator]
- with if: [expression for item in iterator if condition]
- with if and else: [expression if True condition else expression when false for item in iterator] (Iterator is basically a collection)
Here is the example of list comprehension:
List comprehension works for non-numeric data types too.
Challenge: Given a list ["John", "Don", "Ron", "Jane"], can you create a list of names starting with J?
Hint: First letter of string can be checked using my_str[0].
Did you succeed?
If yes, then let’s move to our final part.
Progress Unlocked
- You are now ready to work with real data, not just toy examples.
Adding objects to dataframe
For our Sci-Mate project, we want to assign object value to new row in dataframe.
1. We know how a list can be equated to row in dataframe when we have default indexing
df.loc[len(df)] = [list of data field values]
2. We know how to declare list and access fields of object using .
So, just use
m1 = Member("Ron", 1987, 7788, "City Centre, Gotham City")
That’s it!
Remember, order of fields in list MUST BE same as order of columns of dataframe.
Here ends our theory sessions. Next, we are going to develop an application for Sci-Mate club.
Concepts we learnt revisited:
- Processing and standardizing user input using string methods like lower() and strip()
- Understanding strings as objects of the str class and using common string operations
- Working with tabular data using pandas DataFrames
- Accessing, adding, updating, and filtering rows and columns in a DataFrame
- Performing calculations on entire columns without writing loops
- Saving and loading data using CSV files
- Writing concise and readable code using list comprehension
- Mapping object data fields to a DataFrame row
1-Minute Challenge
In our Member class, create a new member “Jill”, born in 1996, lives in “South block, Gotham City” and you can contact her at “9922”.
1. Add Jill’s name to dataframe
2. Store dataframe to CSV file
3. Load dataframe from CSV file
4. Display details of dataframe using df
Progress Unlocked
- Congratulations!! You have successfully completed your journey of Basic Python
- It’s not easy to reach here
- Now, you know something which many people in the world don’t know
- You are ready to dive into the ocean of Python and develop your skills!!
Let’s Go for Project!