
Sci-Mate Club Member Management System
View or download the code for this chapter on GitHub:
github.com/nousbase-edu-codes/First_Steps_in_Python
Till now, we learned Python concepts in small pieces.
Now we bring those pieces together and build a real, usable system.
This project is not about clever tricks.
It is about thinking like a software developer. Read it calmly, do it!
We will write a simple program that helps manage members of the Sci-Mate Club.
The entire code will run on Google Colab, so no installation is required.
Step 1: Requirement gathering
Before writing code, we first understand the problem.
Imagine this conversation.
Sci-Mate Club Manager:
I want a simple system to manage club members.
Instead of jumping into coding, we ask questions.
After discussion, the requirements become clear.
What the system should do
- Store member details
- Add new members
- Show member information when needed
- Update member details
- Remove members safely without losing history
This is enough to begin designing the system.
Step 2: Identifying core operations
Most data-based systems revolve around four basic operations:
- Create
- Read
- Update
- Delete
These are commonly known as CRUD operations.
For our club system:
| Operation | Meaning in our project |
|---|---|
| Create | Add a new member |
| Read | View member details |
| Update | Change member information |
| Delete | Mark member as inactive |
Important decision:
We will not delete records permanently.
Instead, we will add an active field:
- Y means active member
- N means inactive member
This keeps data safe and retrievable in future.
Step 3: Start implementation: Addressing Storage Requirement
We now decide how data will be stored.
We choose:
- Pandas DataFrame for working with data
- CSV file for saving data permanently
Why this choice:
- Member data is tabular
- CSV works smoothly in Colab
- Pandas makes filtering and updating easy
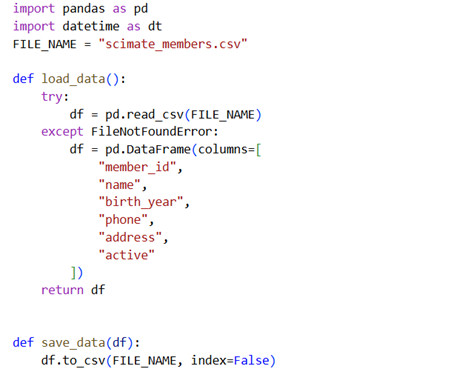
Let's first import pandas and datetime:
import pandas as pd
import datetime as dt
We define the file name in one place. This avoids hard-coding the file name everywhere.
FILE_NAME = "scimate_members.csv"
3.1 Loading data safely
When the program starts:
- Sometimes the CSV file already exists
- Sometimes it does not
If we directly try to read a file that does not exist, Python will stop the program.
So, we tell Python:
Try to read the file. If it is not found, create an empty data structure instead.
def load_data():
    try:
        df = pd.read_csv(FILE_NAME)
    except FileNotFoundError:
        df = pd.DataFrame(columns=[
            "member_id",
            "name",
            "birth_year",
            "phone",
            "address",
            "active"
        ])
    return df
Understanding the code
try: Python is told: I am going to attempt something that may or may not work.
Load the file
df = pd.read_csv(FILE_NAME)
- df gets the data
- Python skips the except part
- Function continues normally
except FileNotFoundError:
If the file is not found, create a dataframe using the required columns.
This becomes our fallback plan.
- We create a fresh data structure
- The program continues smoothly
3.2 Saving data
Whenever we change data, we must save it.
def save_data(df):
    df.to_csv(FILE_NAME, index=False)
when we say, index=False, index of the rows will not be saved to file.
Note that, we are breaking the code into functions and passing dataframe as argument to functions.
This is how our code looks so far.
We have implemented 2 functions for storage requirements.
Functions try to load the file (where data is stored) into a dataframe; if file doesn't exist, it creates the dataframe.
Function returns the dataframe for further processing.
You can take a coffee-break! Then we will move on to the next code.
Step 4: Implementation of CRUD
Let's now start implementation.
4.1 Create
This is the Create operation.
We will:
- Ask the user for member details
- Decide the eligibility of the user
- Generate a unique member ID
- Add the data to the DataFrame
- Save the updated data
Now, generating unique ID is something new we are going to do here.
We will simply assign (index + 1) of the row where member's data will be added.
So, first member will have ID 1 (index of first row: 0 → 0+1 = 1)
If we have 14 members, we will get new ID 15.
Before moving further, we will create a Member class.
It is pretty much similar to what we studied in the book. We have added 2 methods: one to print member details and another to update phone number.
We also updated the constructor a bit.
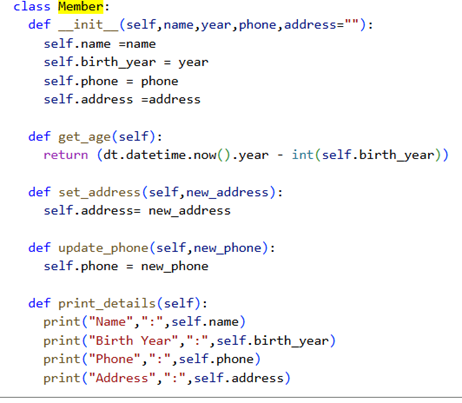
Code for the Member class looks somewhat like this.
class Member:
    def __init__(self, name, year, phone, address):
        self.name = name
        self.birth_year = year
        self.phone = phone
        self.address = address

    def get_age(self):
        return (dt.datetime.now().year - self.birth_year)

    def set_address(self, new_address):
        self.address = new_address

    def update_phone(self, new_phone):
        self.phone = new_phone

    def print_details(self):
        print("Name", ":", self.name)
        print("Birth Year", ":", self.birth_year)
        print("Phone", ":", self.phone)
        print("Address", ":", self.address)
Now we create a method to ask details of user and check eligibility.
We have made a couple of changes to the code.
We combined strip() and lower() to standardize the input.
We stored message for invalid input into a variable so that printing becomes easy.
We have used .max() function on member_id field.
df["member_id"].max() gives us the maximum value in the member_id field.
We are storing "Y" for active member and "N" for those who have left the club.
Since a new member is being added, their active value is "Y".
Following we can see the code of add_member function.
Note: The
before the print line ensures that text is printed on a new line.
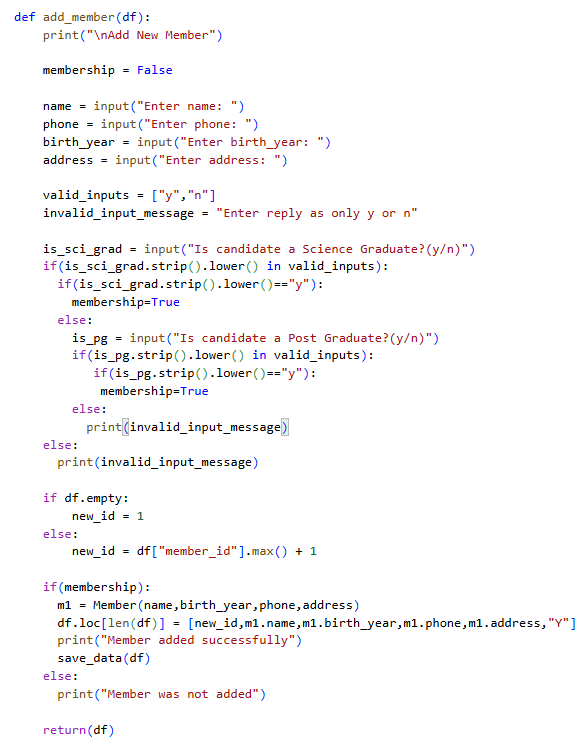
Code for add_member
def add_member(df):
    print("
Add New Member")
    membership = False

    name = input("Enter name: ")
    phone = input("Enter phone: ")
    birth_year = input("Enter birth_year: ")
    address = input("Enter address: ")

    valid_inputs = ["y", "n"]
    invalid_input_message = "Enter reply as only y or n"

    is_sci_grad = input("Is candidate a Science Graduate?(y/n)")

    if(is_sci_grad.strip().lower() in valid_inputs):
        if(is_sci_grad.strip().lower() == "y"):
            membership = True
        else:
            is_pg = input("Is candidate a Post Graduate?(y/n)")
            if(is_pg.strip().lower() in valid_inputs):
                if(is_pg.strip().lower() == "y"):
                    membership = True
                else:
                    print(invalid_input_message)
            else:
                print(invalid_input_message)
    else:
        print(invalid_input_message)

    if df.empty:
        new_id = 1
    else:
        new_id = df["member_id"].max() + 1

    if membership:
        m1 = Member(name, birth_year, phone, address)
        df.loc[len(df)] = [new_id, m1.name, m1.birth_year, m1.phone, m1.address, "Y"]
        print("Member added successfully")
        save_data(df)
    else:
        print("Member was not added")

    return(df)
4.2 Read
There is a lot of possibility in Read operation.
You can provide options to sort data based on various conditions.
Including many conditions will make our project and book longer.
So, we will stick to 3 reads
1. Read all data of all members
2. Read data of all active members
3. Read data of all inactive members
4. Read data of member based on member_id

We run condition to check for which row, entered ID equals to member_id.
Similarly, we use conditions to filter active and inactive members.
As part of exercise, you can introduce more options to filter the data.
The code in text is also shared below along with the adjoining picture.
Note: the before the print line ensures that text to be printed on new line
def view_member(df):
    print("
View Member Details")
    print("1. View by Member ID")
    print("2. View all active members")
    print("3. View all inactive members")
    print("4. view all members")

    choice = input("Enter choice: ")

    if choice == "1":
        mid = int(input("Enter member ID: "))
        result = df[df["member_id"] == mid]

        if result.empty:
            print("Member not found.")
        else:
            print(result)

    elif choice == "2":
        active_members = df[df["active"] == "Y"]
        print(active_members)

    elif choice == "3":
        inactive_members = df[df["active"] == "N"]
        print(inactive_members)

    elif choice == "4":
        print(df)

    else:
        print("Invalid choice.")
4.3 Update
Updating means:
- Data already exists
- We change only one part of it
We must be careful not to update the wrong record.
How update works
- Ask for member ID
- Find the corresponding row
- Ask which field to update (name, phone or address)
- Apply the change
- Save the data
In the code below, you might have noticed a line like this:
df.at[idx, "phone"] = input("Enter new phone: ")
df.at also gives us a way to update a certain value (like df.loc)
syntax is:
df.at[row_index, column_name]
- row_index tells Pandas which row
- column_name tells Pandas which column
We have fetched the index using conditional filter and df.index() method, which is also a new implementation.
Now look at this line again:
df.at[idx, "phone"] = input("Enter new phone: ")
This line does two things at once:
- It takes input from the user
- It stores that input in the dataframe
This is completely valid and intentional.
Purpose of using these methods and ways is to get you acquainted with the same.
You can also use the methods we discussed in book.
In the code, after receiving member ID, we first check if member exists with this ID or not.
If ID is not found, we simply return to the main menu.
I would once again like to fetch your attention to dataframe df passed as an argument to the function and returned as the value by every function.
Imagine it like, when your phone malfunctions, you give to service centre. Service centre processes to repair it and returns it back to you.
Code for the method is as below:
def update_member(df):
    print("
Update Member")

    mid = int(input("Enter member ID: "))
    index_list = df.index[df["member_id"] == mid].tolist()

    if not index_list:
        print("Member not found.")
        return df

    idx = index_list[0]

    print("1. Name")
    print("2. Phone")
    print("3. Address")

    choice = input("What do you want to update: ")

    if choice == "1":
        df.at[idx, "name"] = input("Enter new name: ")
    elif choice == "2":
        df.at[idx, "phone"] = input("Enter new phone: ")
    elif choice == "3":
        df.at[idx, "address"] = input("Enter new address: ")
    else:
        print("Invalid option.")
        return df

    save_data(df)
    print("Member updated successfully.")
    return df
4.4 Delete
In the code for deleting the member, we just set active status to "N".
It is not good idea to entirely drop the data. Club may need to preserve the data of inactive members for various reasons too.
Below is the code:
def deactivate_member(df):
    print("
Deactivate Member")

    mid = int(input("Enter member ID: "))
    index_list = df.index[df["member_id"] == mid].tolist()

    if not index_list:
        print("Member not found.")
        return df

    idx = index_list[0]
    df.at[idx, "active"] = "N"

    save_data(df)
    print("Member deactivated.")
    return df
This code is pretty much simple.
I expect you to understand this and be able to explain it.
Can you?
Step 5: Co-ordinating all
We have written so many functions! Nearly 6!
But how and when to call them?
We will provide user with a menu driven application.
We will provide a list of menus for various actions. Based on his choice, we will turn the flow of code to appropriate function.
Let's first create a simple menu.
def main_menu():
    print("
Sci-Mate Club Management")
    print("1. Add member")
    print("2. View member")
    print("3. Update member")
    print("4. Remove member")
    print("0. Exit")
This gives user an option to enter the menu.
Based on selection, we call appropriate function.
Let's write a controlling function. This function will first run main_menu and then call suitable function and return to the same screen.
def run_program():
    df = load_data()
    while True:
        main_menu()
        choice = input("Enter choice: ")
        if choice == "1":
            df = add_member(df)
        elif choice == "2":
            view_member(df)
        elif choice == "3":
            df = update_member(df)
        elif choice == "4":
            df = deactivate_member(df)
        elif choice == "0":
            print("Exiting program.")
            break
        else:
            print("Invalid choice. Try again.")
Here, we are using while True.
This means, this loop will continue to run forever!
But we care about our machine too!
So, we provide option to an user to exit this forever loop.
When user enters "0", we have used break keyword.
This keyword essentially tells that, break this forever loop!
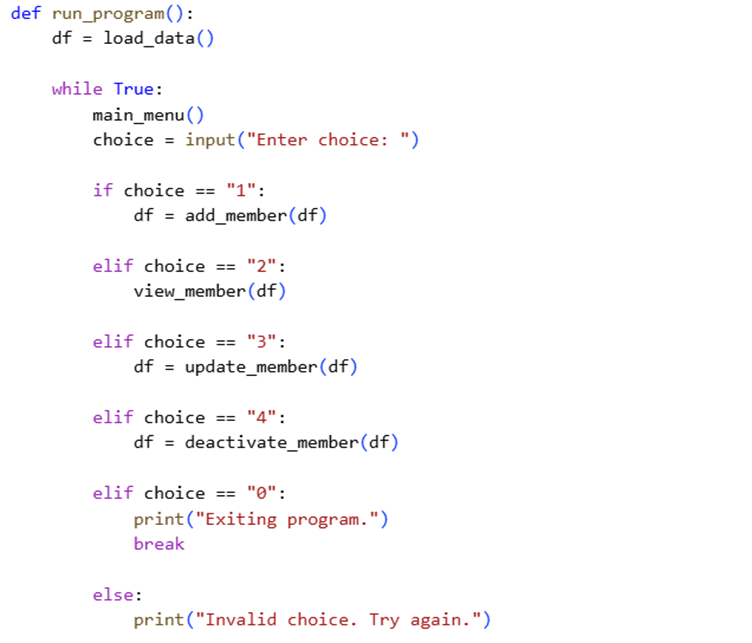
Here is the screenshot of the code.
And that's it.
It's time to run the code.
If you have written all code in same cell, no issues. Otherwise, first run all the cells and then in new cell type
run_program()
Congratulations!!!
You have created a real-life project with Python!!!